Hair Grooming and simulation
Houdini's a wild ride! It's jam-packed with endless possibilities, keeping the learning curve exciting and ever-expanding. I've always had my eye on mastering hair grooming in Houdini—creating guides, playing with clumps, curls, frizz, fades, you name it!
But it doesn't stop there! This project dives into the thrill of animating hair, even throwing collision objects into the mix for some serious simulation magic. It's been a blast exploring Houdini's hair-raising potential!

PAINT HAIR MASKS
Before we dive into the hair magic, let's start by painting some attribute masks. It's like prepping a canvas—helps us decide where to make our model's hair denser, where those cool hair clumps go, and how to create that slick fade from base to tip.
Next step: setting up two nulls. One's for the model and its attributes, while the other's a VDB version ready to handle all those hair collisions.
Creating Guides
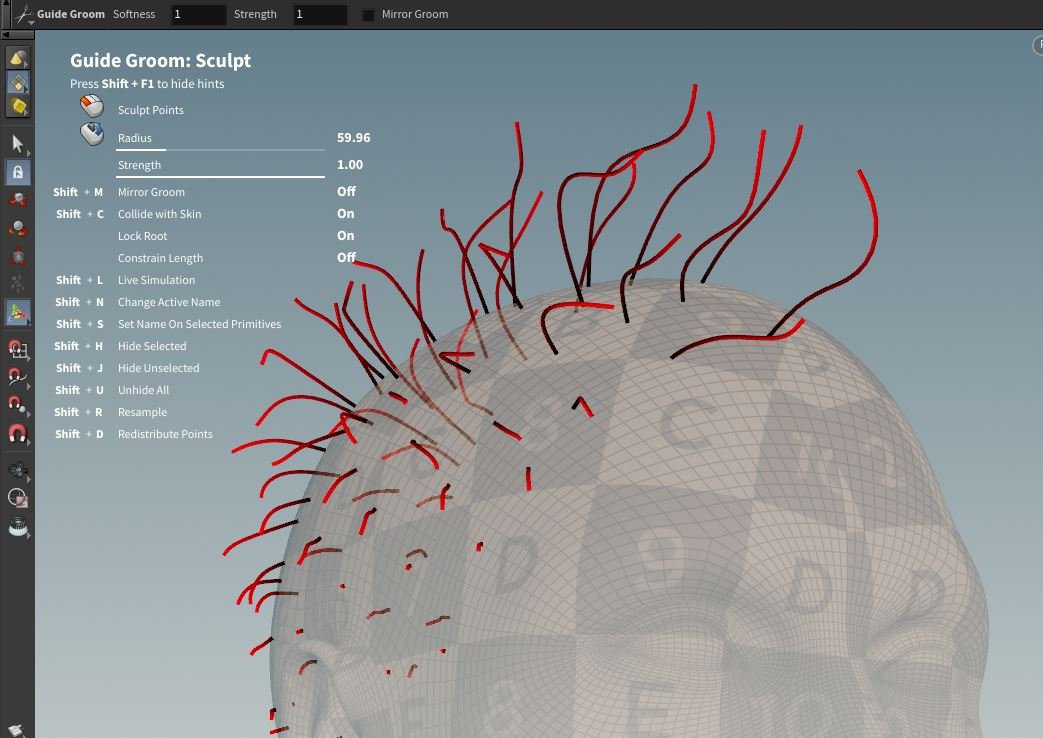
Now that's sorted, time to prep the guide groom! We're diving into the guidegroom node, doing all sorts of cool stuff—drawing guides, sculpting them, cutting, adjusting lengths, and giving them that smooth touch. I went for the smart move, focusing on just one side of the head to keep things manageable. Then, voila! Mirrored those guides to cover the whole head evenly.
Here's the deal: don't crowd those guides too close to the scalp; we want the right hair shape! Oh, and for that slick hair fade, keep those bottom guides tiny, gradually sizing them up towards the top. It's all about nailing that perfect length mask for the ultimate hair generate node magic

Hair Generate and styling
"Next up, the hair generate node. Before we amp up the density, ensure it's set to the skin attribute and select your density mask. This precision is key—it'll confine the hair strictly to the desired areas.
Now, here's the trick: for the hair simulation, keep the final density lower than the actual one. While you add clumps, curls, and frizz (at a high hair density), adjust it down. These dense hairs will serve as guides for the smooth simulation run. Once that's done, we'll restore the original settings and bring that density back up.

Rigging and Collision
Skipping the nitty-gritty of Houdini's KineFX rigging and animation tools, I used the base human model, isolated the hand and forearm, and removed the unwanted geometry. Then, I rigged the hand and animated the fingers to curl and open. These animations were set up to glide over the hair guides, acting as collision object for our hair simulation

Hair Simulation
Now for the exciting part! We take those hairs we made and bring them into geometry nodes as guides. Using some VEX techniques, we set the first point of each hair guide to act as a pin constraint in our hair vellum simulation. We import our animated hand as a collision object and connect it to a vellum solver.
Once the simulation's done its thing and we've cached it, we link it to a fresh hair generate, clump, and guide process node. Here, we mimic our original guide groom settings, ramp up the hair density, and let the solver work on our actual hairs. The toughest part? Getting that hair growth animation to play nice with the simulation.